

Scripts for the lazy, the tinkerers, and the lazy tinkerers
In April, GitHub released new pricing plans that looked awfully affordable… and by affordable, we really mean free, because we don’t yet need the features on the new paid plans. As Bitbucket users since 2013, we have long been envious of the larger selection of integrations available to GitHub users. So with the new plans, coupled with cost-cutting pressure from COVID-19, this seemed like a great time to switch.
We chose Bitbucket early on because their plans allowed for unlimited repositories. As programmers who didn’t like cleaning up our messes, you can imagine, we have collected many repositories over the last 8 years—175, to be exact. Far too many to move by hand! Encouraged by a helpful 2018 post and script from Continuum titled “Moving all your Bitbucket Repositories to GitHub”, we figured that wouldn’t be a blocker.
Unfortunately, in the two years that passed, Bitbucket has since deprecated their version 1.0 API and we had to tweak things more than a little. And while modifying the code, we figured we would take the chance to tidy up our repositories by splitting them into different organisations, renaming them, providing better descriptions, and even archiving some of them right after migration. After finishing all this, we thought we should share this for anyone considering a similar move!
So here’s our process for migrating all our repositories from Bitbucket to GitHub in 2020. We assume you already have your SSH keys set up for your Bitbucket and GitHub accounts.
Step 1: Extract a CSV list of all your Bitbucket repositories
Download the bash script list-bitbucket-repositories.sh from https://github.com/tinkertanker/bitbucket-github-migration:
… then run it, fill in your username and password (perfectly safe, it just goes to Bitbucket—take a look at the source code, and at our footnote at the end of this article), and save the output to a CSV file, say bb_repositories.csv. You can choose any other name for the output file, of course.
$ bash list-bitbucket-repositories.sh > bb_repositories.csvThis gives you a CSV list of all the repositories you have access to, regardless of organisation. Open this up in your favourite spreadsheet app and you should get something like this:
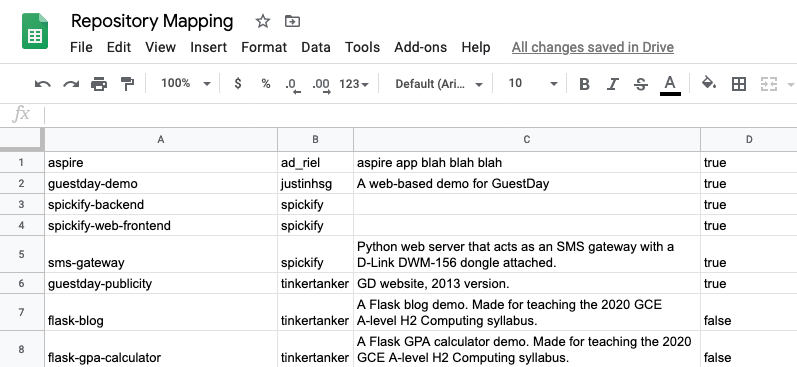
Step 2: Add headers and columns to prepare for migration, and take this chance to tidy up your repositories
- Add headers to the CSV that got generated in the previous step [BB Repo Name, BB Org, Description, Private]
- Add some columns so specify where in GitHub to send your repositories to, as well as whether to archive your repository after uploading. The final CSV field order should be [BB Repo, BB Org, GH Repo, GH Org, Description, Private, Archive]
- Share this list with your teammates and take this chance to reorganise stuff and mark old repositories for archival. GitHub doesn’t have the same concept of Projects that Bitbucket does for organising repositories, but you can at least filter repositories on your dashboard by with the search query
archived:false. Remove rows for repositories you don’t want to migrate too, of course.
Note: Don’t put any commas in any of the fields, not even the descriptions, or the script in Step 3 will get confused.
Here’s what your CSV should look like when you’re ready:
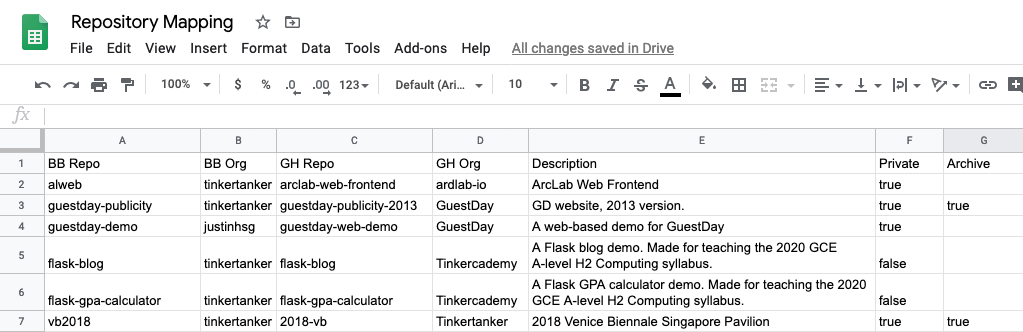
Export or download your spreadsheet as a CSV file.
Step 3: Actually migrate your repositories
Download the bash script migrate-repositories-to-github.sh from https://github.com/tinkertanker/bitbucket-github-migration:
… then run it with your CSV file, say repository_mapping.csv, from Step 2 as the argument:
$ bash migrate-repositories-to-github.sh repository_mapping.csvAnd it’ll go chugging along. Watch out for some possible errors:
- Did you remember to remove all commas from your CSV? This method of parsing CSV really doesn’t do well with commas. If you see
"message": "Problems parsing JSON"somewhere in your output, you probably left a comma in one of your descriptions. - If you had any files larger than >100MB in your Bitbucket respository, you’ll see
remote: error: GH001: Large files detected—these repositories will have to be moved manually. We haven’t figured out the best way to remove the large files without rewriting git history yet. - Don’t forget to check the repositories that were created in GitHub and see that they match and are not empty. Empty repositories won’t have a language detected. You can use search queries to filter repositories in GitHub, e.g. the query
created:>2020-05-29T15:00:00+08:00would show only repositories created after 3pm on 29 May 2020, in timezone UTC+8.
And you’re done! If you have any suggestions or fixes, please send us an issue or pull request over at the GitHub repo. Happy migrating!
For migrating issues (as in, migrating the issues that were raised on your repo, not issues about migrating), we’re happy to report that this handy script still works and appears to be actively maintained (but of course, all migrated issues will be “opened” by the user doing the migration): https://github.com/jeffwidman/bitbucket-issue-migration
Script implementation notes for the bash-curious!
- For both scripts, we use
read -pto prompt for usernames and passwords. The alternate approach of providing credentials on the command line, whether as an argument or by setting an environment variable, leaks your passwords to your bash history. tail -n +2, in Line 2 of the migrate script, skips the header row from the CSV file.tr -d '\r', also in Line 2 of the migrate script, converts the line endings from DOS/Windows to Unix (and does nothing if the file is already using Unix line endings) — Google Sheets saves CSV files with DOS line endings.IFS=,, still in Line 2 of the migrate script, sets the internal file separator to commas. If you absolutely absolutely need to have commas in your descriptions you could probably useIFS=$'\t'instead and export your spreadsheet as TSV.