

Editor’s note: Hongyi interned with us in February and March in 2019. She’d just finished her A-levels, and will be starting her undergraduate studies later this year. Here’s her contribution to our blog:
I had my first experience laser-cutting some weeks ago. It was pretty sweet. Laser cutting can be quite daunting for a first-timer. Is this loud sound normal? Will the machine explode?
Here are some of the essential to-know’s for my fellow first-time laser cutters!
Just Starting Out..
Get the right equipment. Make sure you have a laser cutter. I used Full Spectrum Laser Cutter. To create a vector drawing (for cutting), I used Inkscape. It might be slightly different if you used different equipment and software but the gist and underlying principles in this article should remain the same.
Creating Your Drawing
I am an artist!
I used Inkscape to create my drawings. I highly recommend going through the four Inkscape tutorials below if you have never used Inkscape before. These are the ones I found useful inducting me to this whole vector-drawing-verse. Don’t worry too much about the keyboard commands if you are not a fan. I seldom use them, and I did alright. I have outlined what’s important in each tutorial below.
- Basics: Know how to zoom, move, rotate, scale, duplicate, align and group shapes. Also know how to fill and stroke a shape.
- “Advanced”: Pasting tricks, simplifying paths.
- Tracing Bitmaps: If you are lazy to make your own vector drawing, you can convert an existing image and work from there.
- Editing Paths by Nodes: Since we are working with .svg vector drawings, knowing how to edit paths by nodes will give you that added precision and control over your creations.
I try…
For pre-made laser cut projects, or laser cut inspo, check out Thingiverse.
Preparing Your Drawing for Printing
If there are some lines you only want to lightly engrave, and others you want to intensely cut through, you can prepare your vector drawing for that by adjusting lines’ stroke and colour settings. These different settings can help you differentiate the lines when you open your your laser cutting software (I used RetinaEngrave).

I used thick blue lines (0.8 mm stroke width) for what I want to cut through, and black for what I want to engrave.
Start Cutting
Yes, the loud sound is normal. No, your co-workers cannot hear you (?). But, knowing that you are making cool things can be motivation enough to disturb them anyway. Just kidding.
Before cutting, you would need to ‘Home’ the laser. Ensure there is 2.0 cm distance between the laser and the material you are cutting. Ensure a fire extinguisher is nearby (no joke, not that you would likely use it).
Settings to use
In general, choose ‘Vector Cut’ setting instead of ‘Raster Engrave’. When using Vector Cut, the laser will follow the path of your drawing. Retina Engrave may occasionally be preferable for engraving, but I personally use Vector Cut for everything.
To cut through 3.0mm acrylic, I used 100% laser intensity at maximum speed, and cut the pattern 5–6 times. To engrave acrylic, any setting less intense than the above will work. You can decide how deeply you wish to engrave.
OMG, There is a Fire!
Yes. After filming the mini-fire with your phone and getting too excited over the poor video quality, you might start worrying a bit.
If you had ensured sufficient distance between the laser and the material (2.0 cm in my case), you would not usually damage the machine.
If you want to avoid a fire, and also facilitate quicker cleaner cutting, it is advised to remove the sticky protective sheet on the acrylic before you begin. Typically, it is the sticky protective sheet that catches fire when you cut.
After Cutting (IMPORTANT!)
A typical rookie mistake is to remove your material before it is fully cut through (due to poor gauge of laser intensity). This is disastrous because it is almost impossible to re-position your material back into its original position for more cuts.
Now, you are left with a semi-cut acrylic which will be wasted. :(
Before removing your cut material, it is adviseable to gently knock on the material and inspect it to ensure it has been fully cut through. If you are unsure, it is always good to err on the side of caution and cut more times. A wasted piece of acrylic can feel very depressing (personal experience).
Extra: Combining Laser Cut Things to Make a 3D Structure
For my first laser cutting project, I was making a laptop/keyboard/iPad holder. This was created by fixing many acrylic plates together to create a 3D structure.

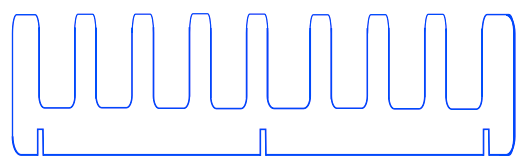
These are the two base structures I cut (not to scale). Which are fitted together to make a 3D laptop/keyboard/iPad holder.
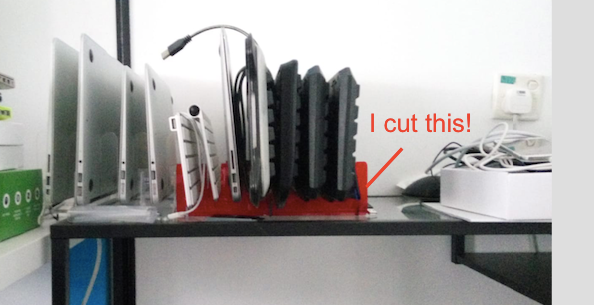
Laptop/keyboard/iPad holder.
When creating grooves for fitting parts together, I recommend using trapeziums rather than a uniform rectangle. This ensures better fit. You also have more lee-way for mistake, in case of cutting discrepancies.

Trapezium groove to fit a 3.0mm thick part: The longer width at the top is larger (3.8mm), while the shorter at the bottom width is just right (3.2mm).
Extra: Building More Robust Structures
The way you design your structure can also have a huge impact on how quickly you structures will break. In general, thin pieces of acrylic break off easily. In creating grooves or other designs, always design for wider slabs.

Thin is bad.

Wide is good.
Cleaning Up…
Congratulations, you have made your first laser cut thing! Remember to vacuum any scrap bits or dust in the laser cutting machine. This is so that they would not accumulate into a big life-threatening fire next time.
Enjoy :)
Editor’s Note: At time of writing, Hongyi is deciding where to go for her first year of undergraduate studies, and is interning with Hustle Fund, a VC and a friend of the company. She did a variety of software, hardware, and education-related projects for us, and was generally pretty awesome; feel free to email us for an effusively positive testimonial.